Skip to content

Facebook Social Authentication – getting a Facebook app key

Create a Facebook app, take its App ID and App Secret, and connect them to Listivo so visitors can log in with Facebook — including the App Review and publishing steps Facebook requires before the login works for the public.

3 minute read

Create the Facebook app

  1. 1 Open the Facebook for Developers page

    Visit https://developers.facebook.com/apps/.

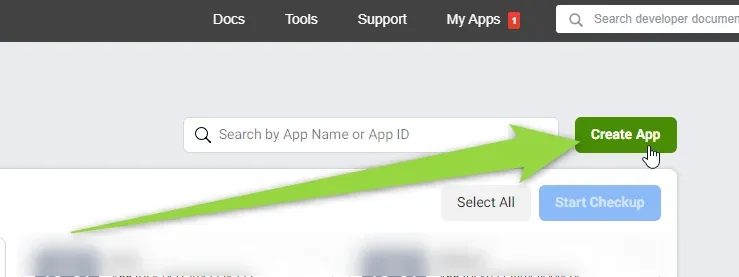
  2. 2 Click Create App The Facebook for Developers My Apps page with a search box for app name or ID and a green Create App button. A large green arrow points at Create App; the app list below is blurred.
  3. 3 Fill in the app details

    Enter the App name and the app contact email, then click “Next”.
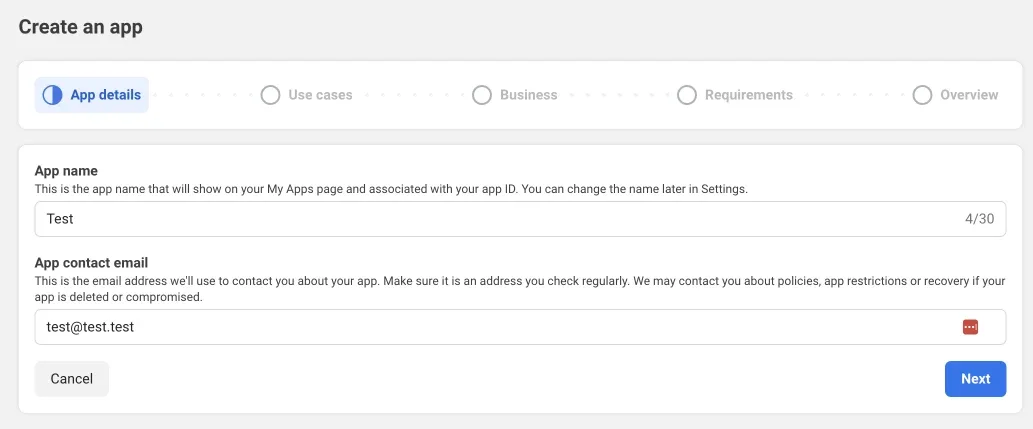
    The “Create an app” wizard on the App details step, with App name filled in as “Test”, an App contact email of test@test.test, and Cancel and blue Next buttons.
  4. 4 Choose the use case

    In the “Use cases” step choose “Filter by: All”, select “Authenticate and request data from users with Facebook Login” and click Next.
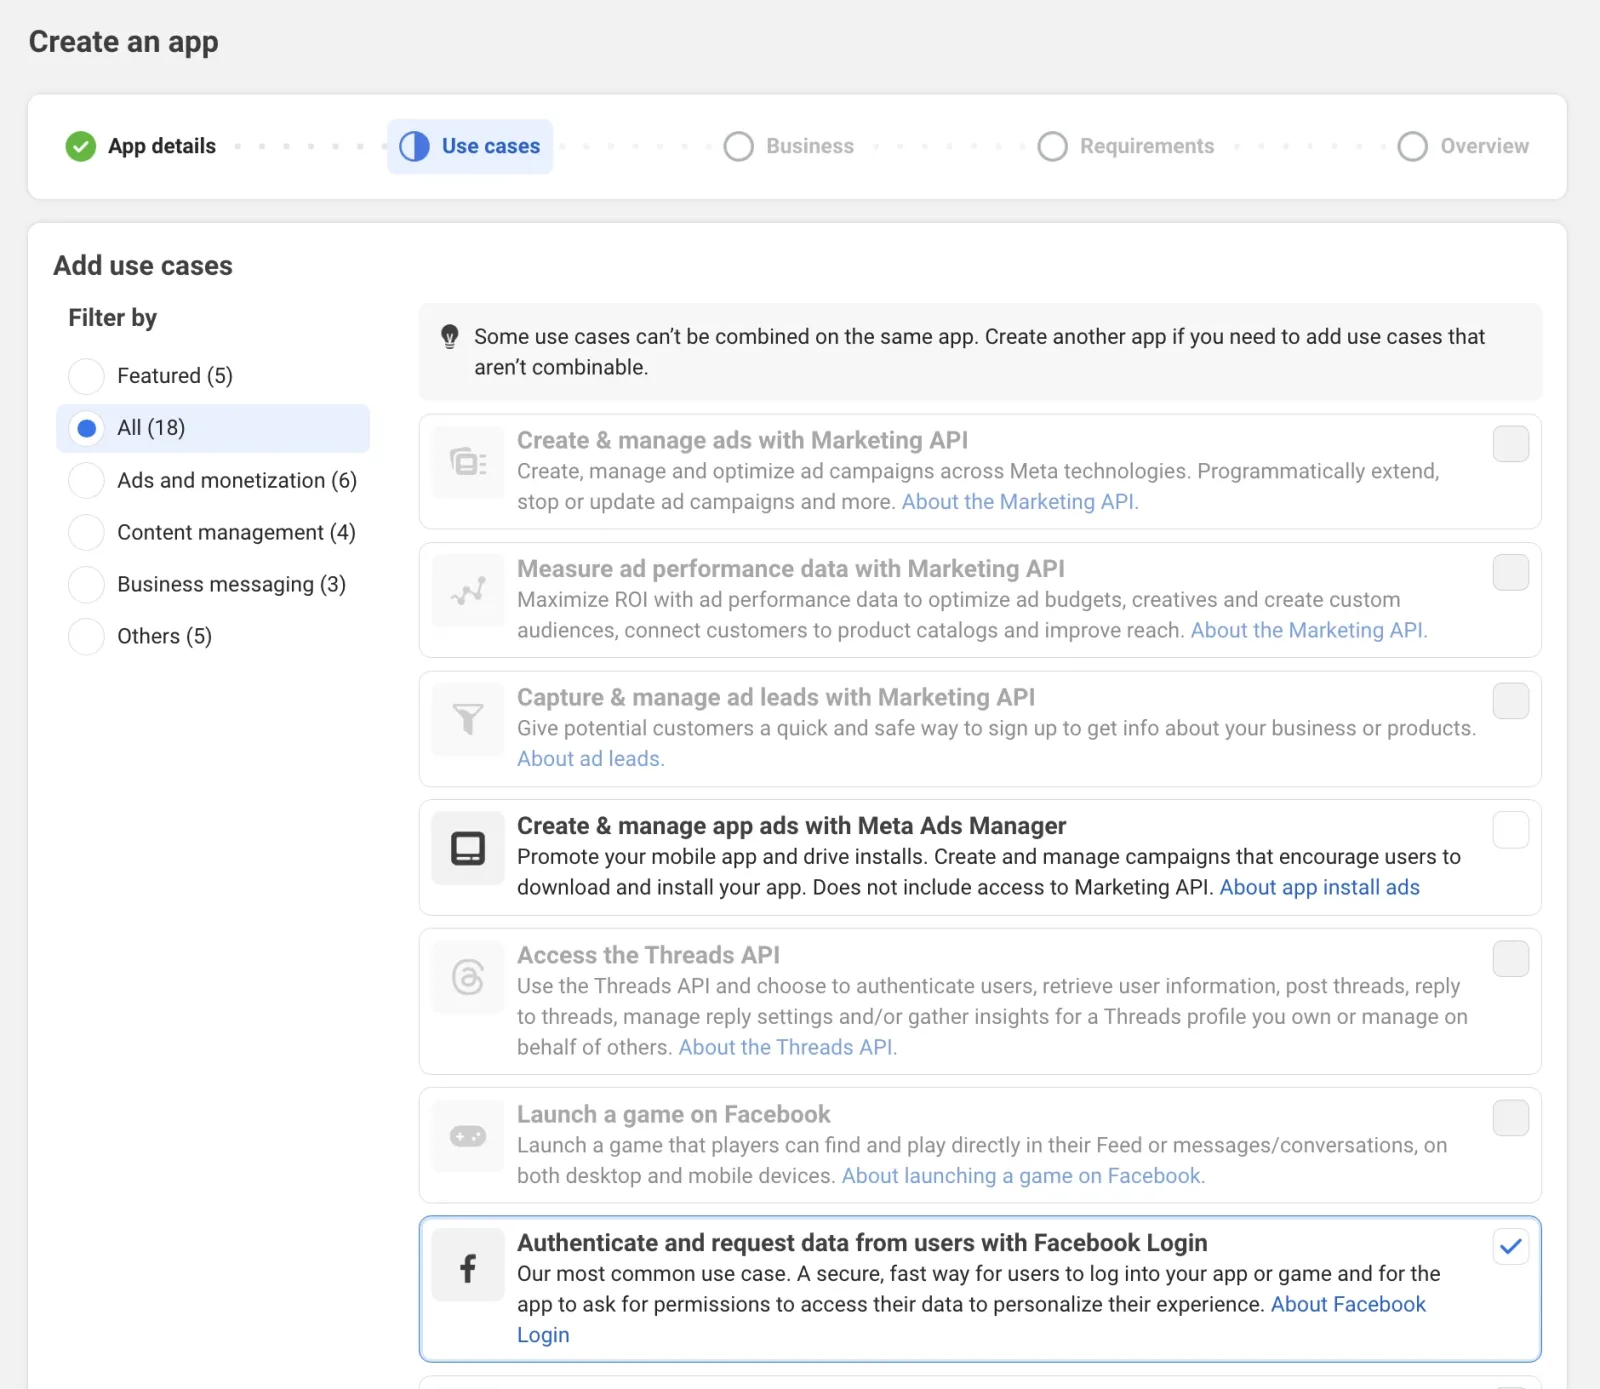
    The Use cases step with “Filter by: All (18)” selected in the left column and a list of use cases; the last one, “Authenticate and request data from users with Facebook Login”, is ticked and highlighted.
  5. 5 Choose a business portfolio

    You can select “I don’t want to connect a business portfolio yet”, or a business portfolio if you have already created one. It is up to you.
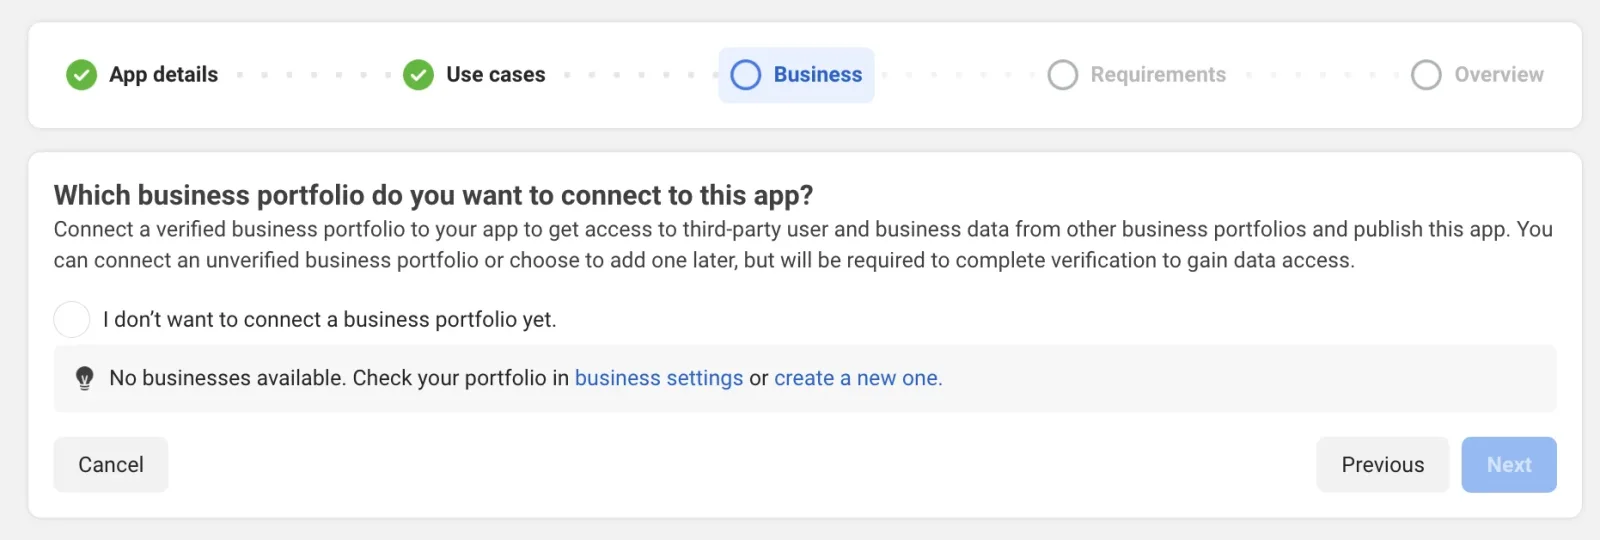
    The Business step asking which business portfolio to connect, with the option “I don’t want to connect a business portfolio yet” and a note that no businesses are available, above Previous and a greyed-out Next.
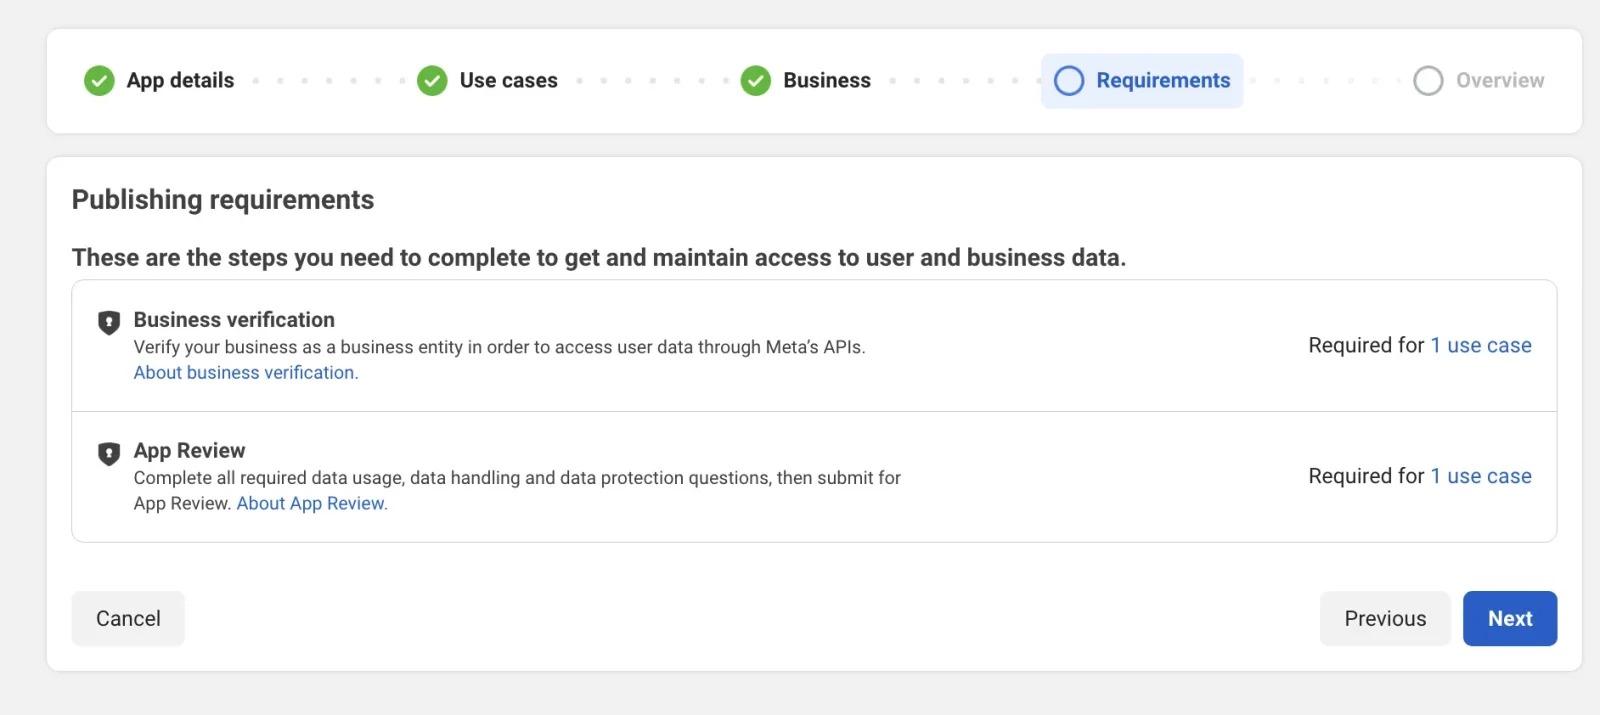
  6. 6 Review the requirements The Requirements step, “Publishing requirements”, listing Business verification and App Review, each marked “Required for 1 use case”, above Cancel, Previous and Next buttons.
  7. 7 Finish the wizard

    In the overview step just click the “Go to dashboard” button.
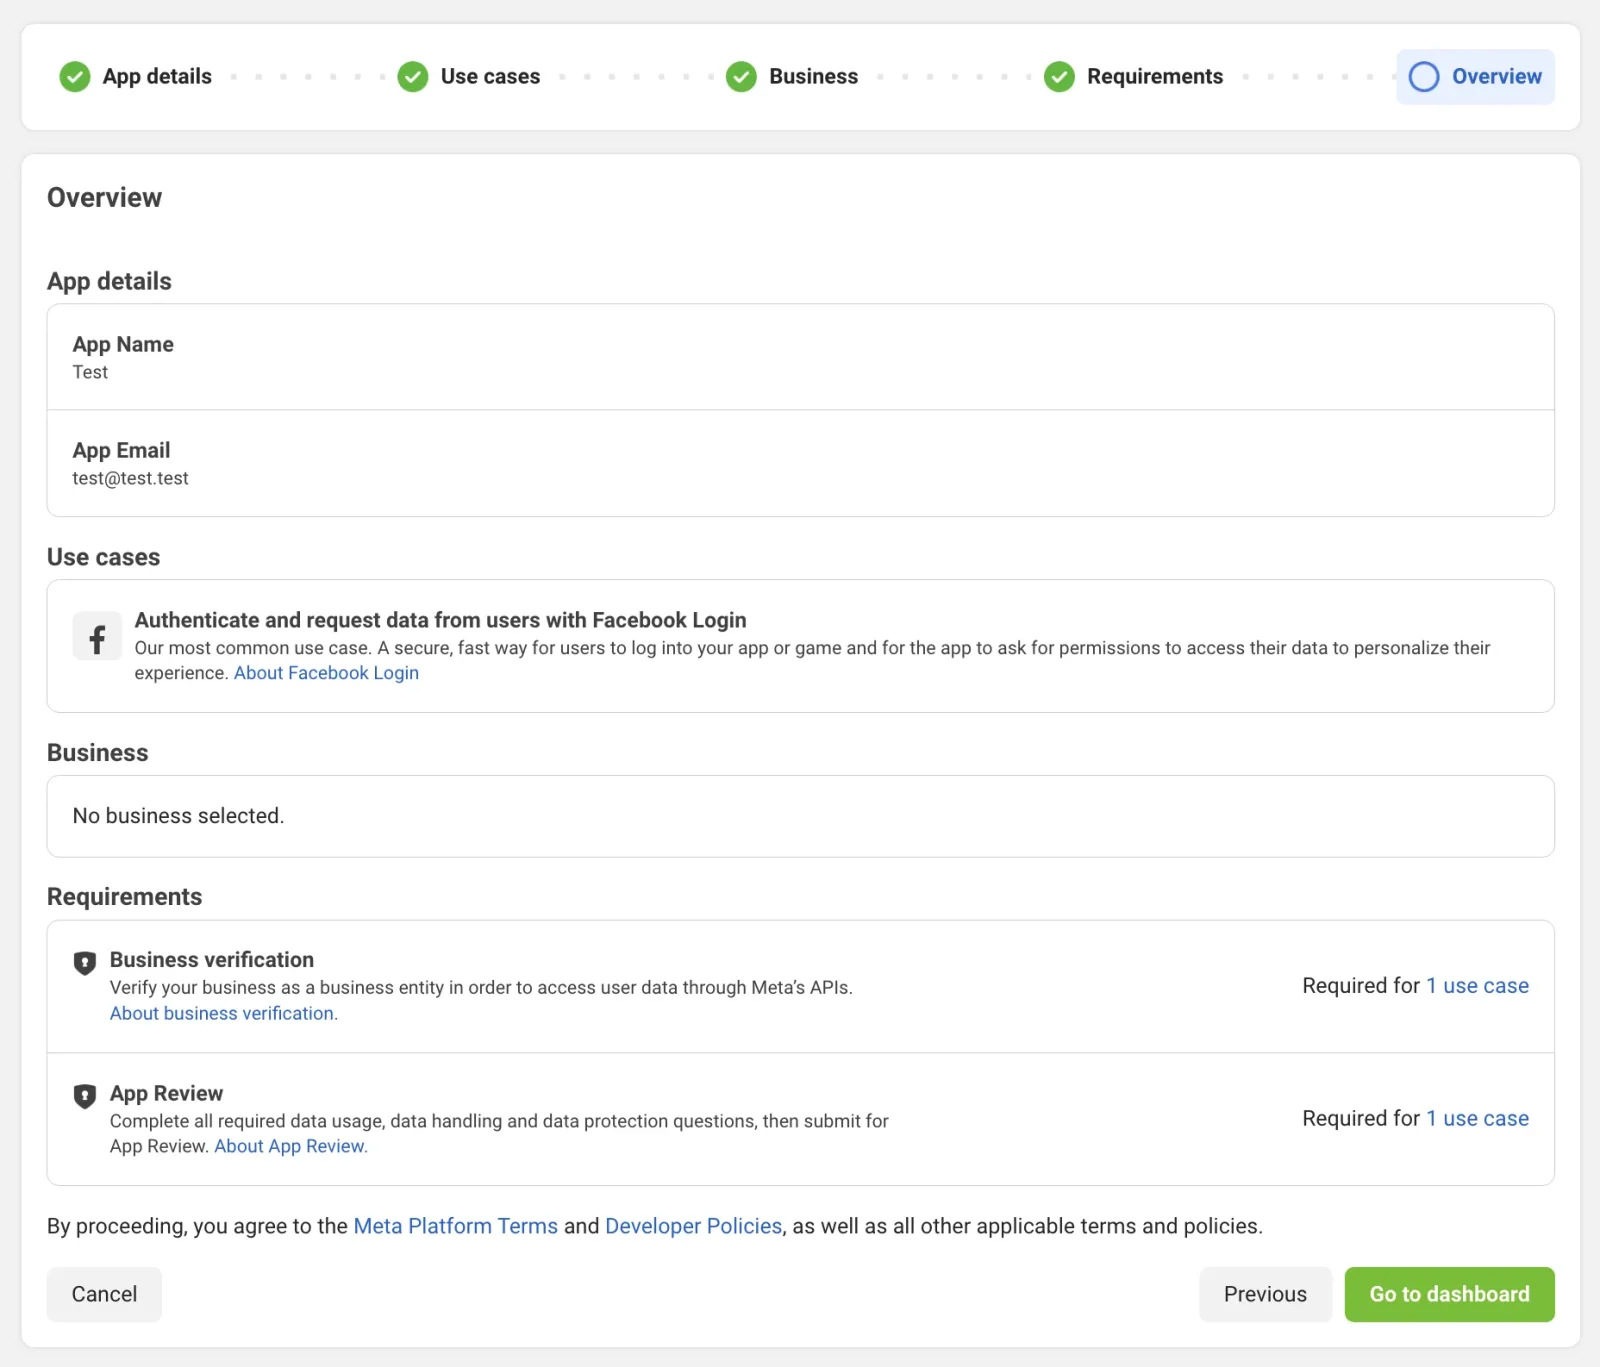
    The Overview step summarising the app: App Name “Test”, App Email, the Facebook Login use case, “No business selected” and the two requirements, with a green “Go to dashboard” button.

Configure the Facebook Login use case

  1. 1 Open app customization and requirements

    You have been redirected to the dashboard. Select “App customization and requirements”.
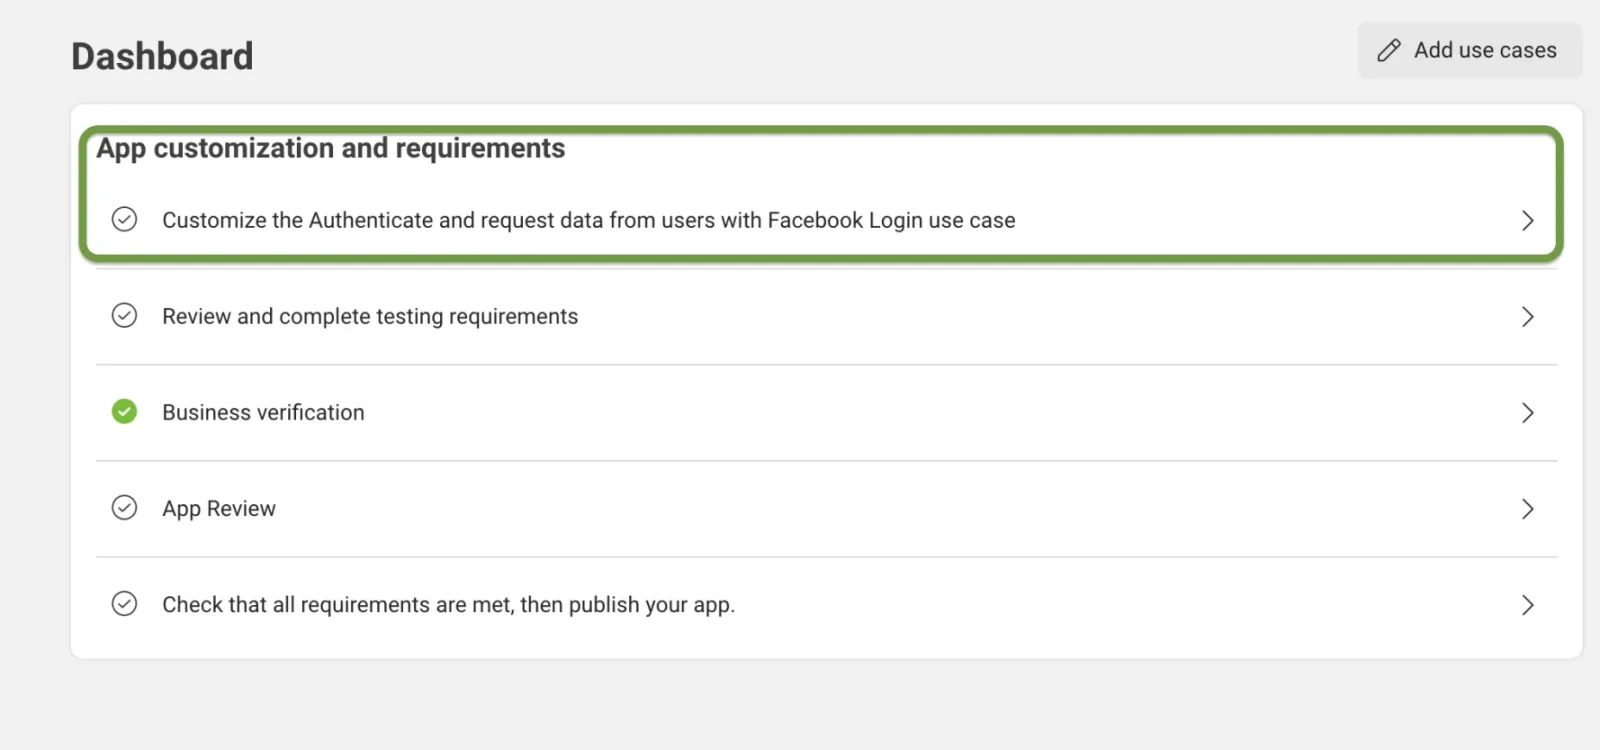
    The app Dashboard checklist. The first row, “App customization and requirements”, is outlined in green; below it are testing requirements, Business verification ticked green, App Review, and a final publish check.
  2. 2 Add the email permission

    In the “Permissions and Features” panel, add the “email” permission.
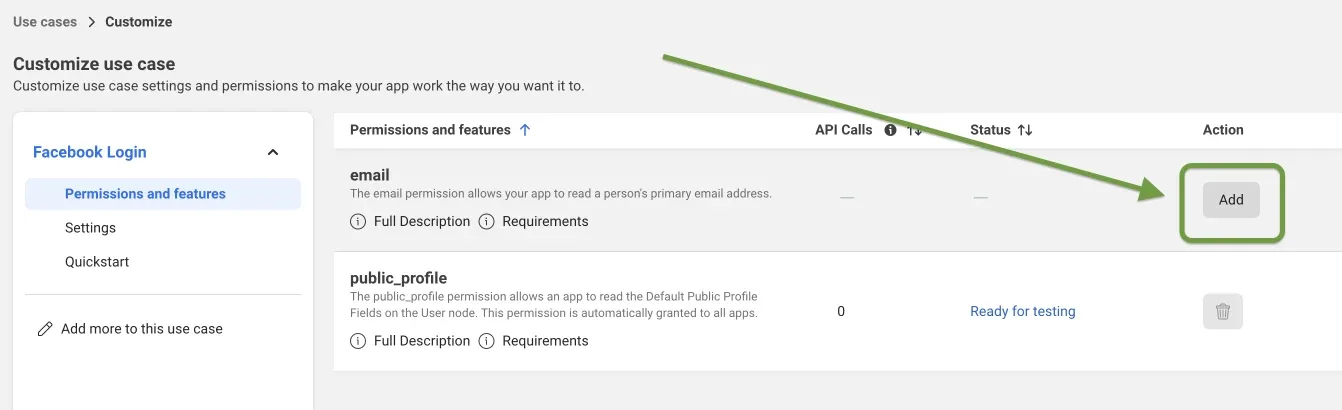
    The Customize use case screen for Facebook Login. The permissions table lists email with no status and public_profile marked “Ready for testing”; a green arrow points at the Add button on the email row.
  3. 3 Open the Valid OAuth Redirect URIs field

    Go to the “Settings” tab and add the Valid OAuth Redirect URIs – in the next step, you will find out where to get this address from.
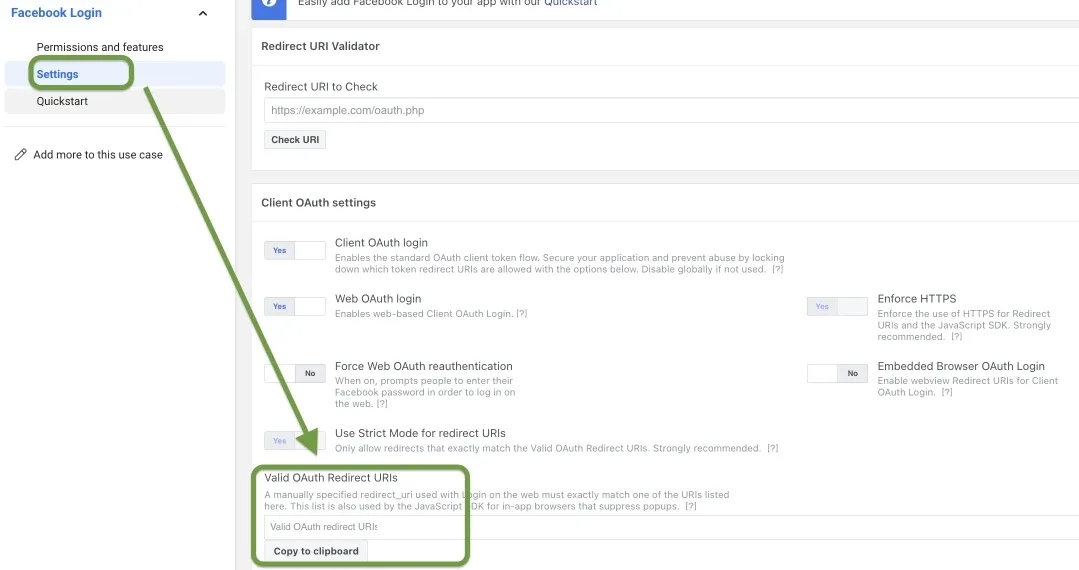
    The Facebook Login Settings page: a Redirect URI validator, Client OAuth settings toggles, and the “Valid OAuth Redirect URIs” box outlined in green with a “Copy to clipboard” link. Arrows point at Settings and at the box.
  4. 4 Copy the redirect URI from your panel

    Copy your OAuth Redirect URI from Listivo Panel > User Panel.
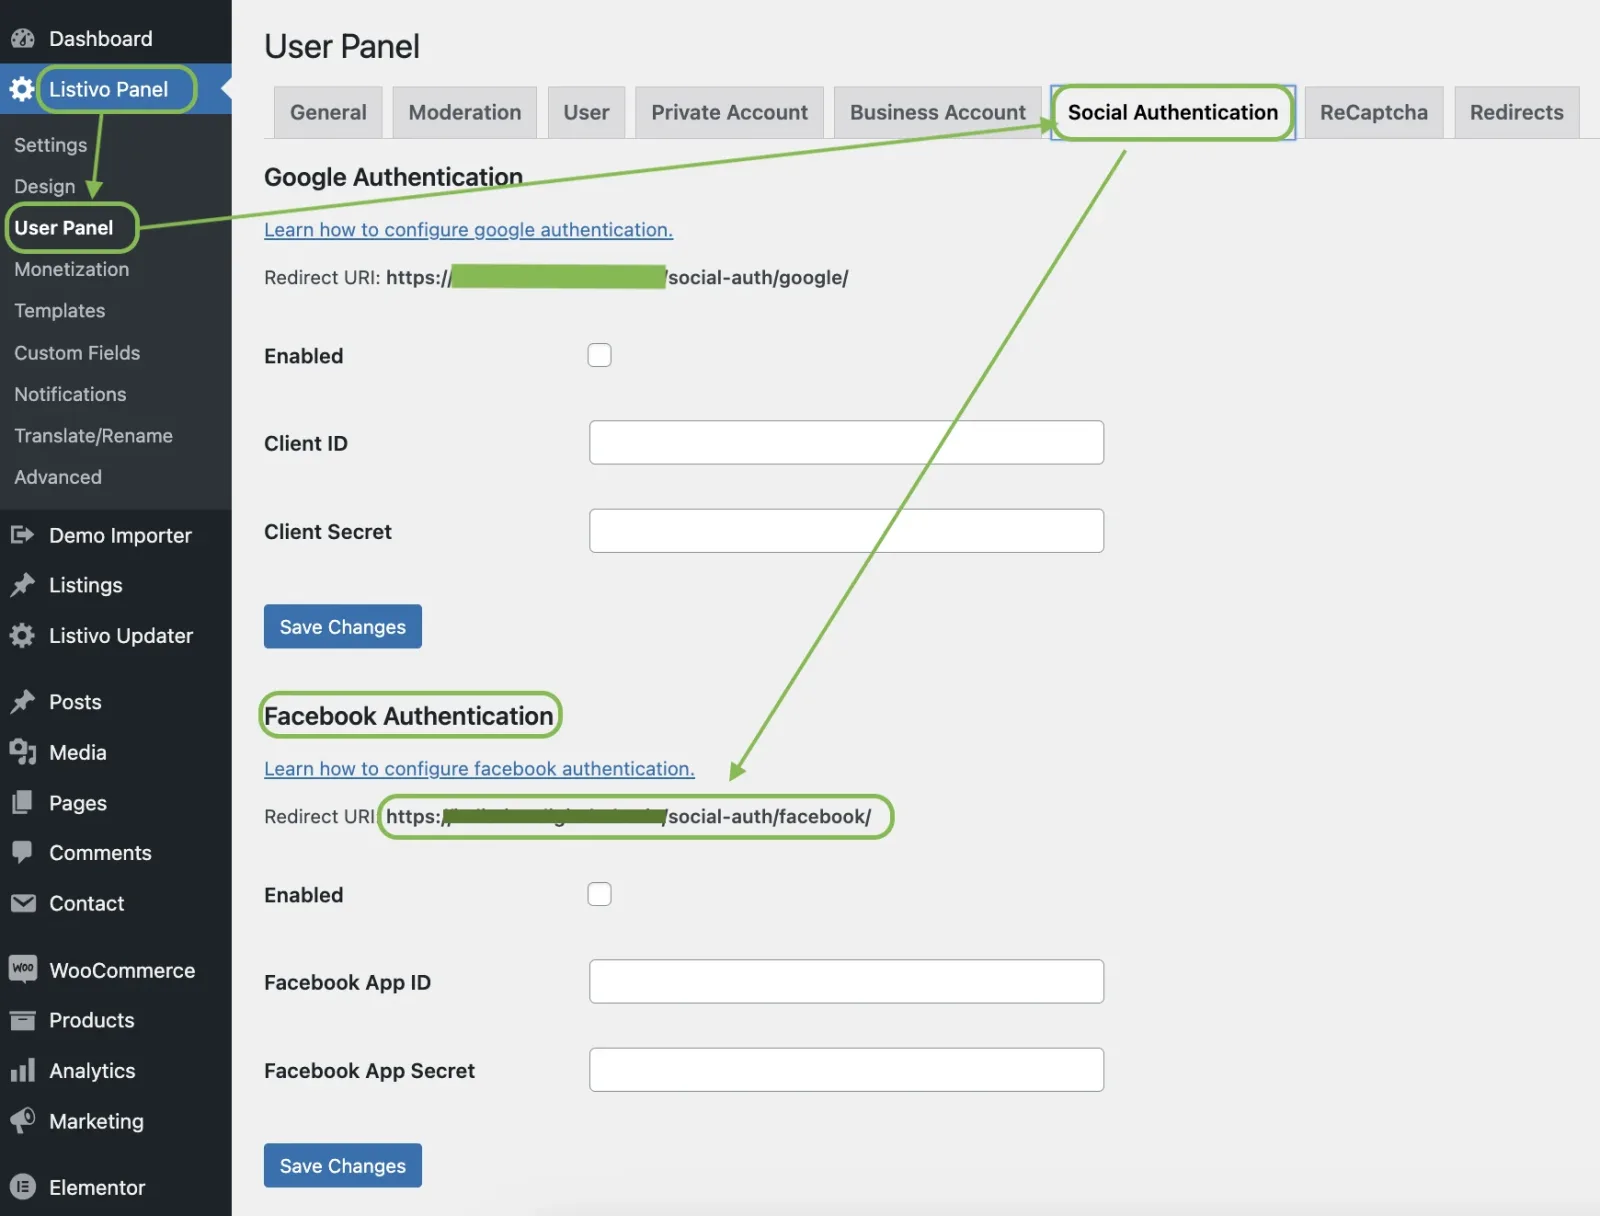
    The Listivo Panel User Panel screen on the Social Authentication tab. Green arrows point at the tab and at the Facebook Authentication section, where the Redirect URI ending in /social-auth/facebook/ is outlined.
  5. 5 Select the Web platform

    Go to “Quickstart” and select the “Web” platform.
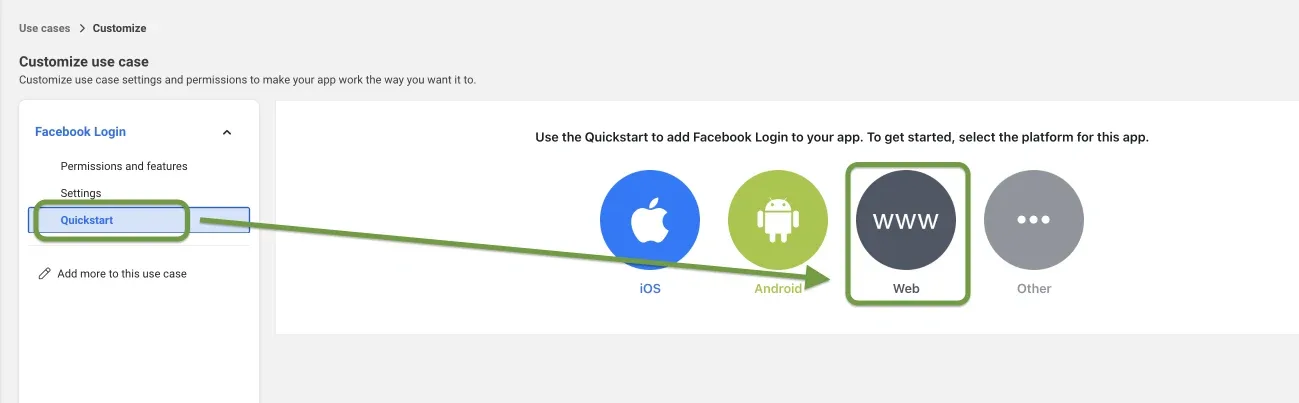
    The Quickstart screen for Facebook Login showing four platform choices — iOS, Android, Web and Other. Green arrows point at Quickstart in the left menu and at the Web option, which is outlined.
  6. 6 Add your site URL

    Add your domain in the “Site URL” field and click “Save”.
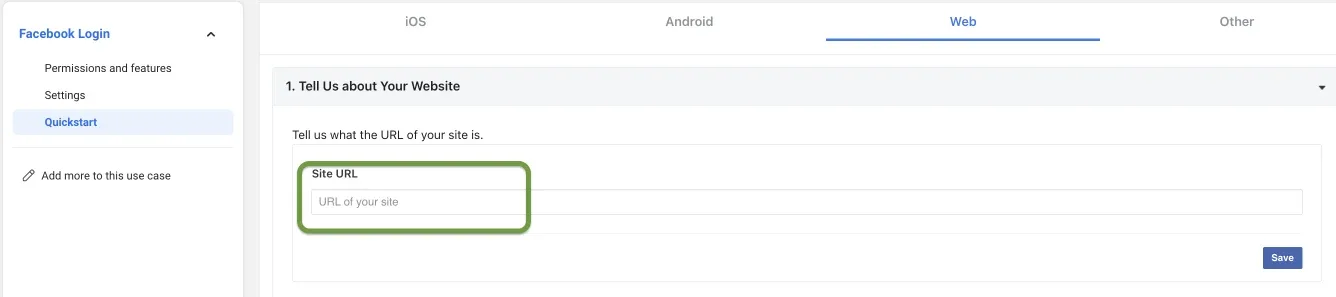
    The Web quickstart, step “1. Tell Us about Your Website”, with an empty “Site URL” field outlined in green and a blue Save button on the right.

Complete the basic app settings

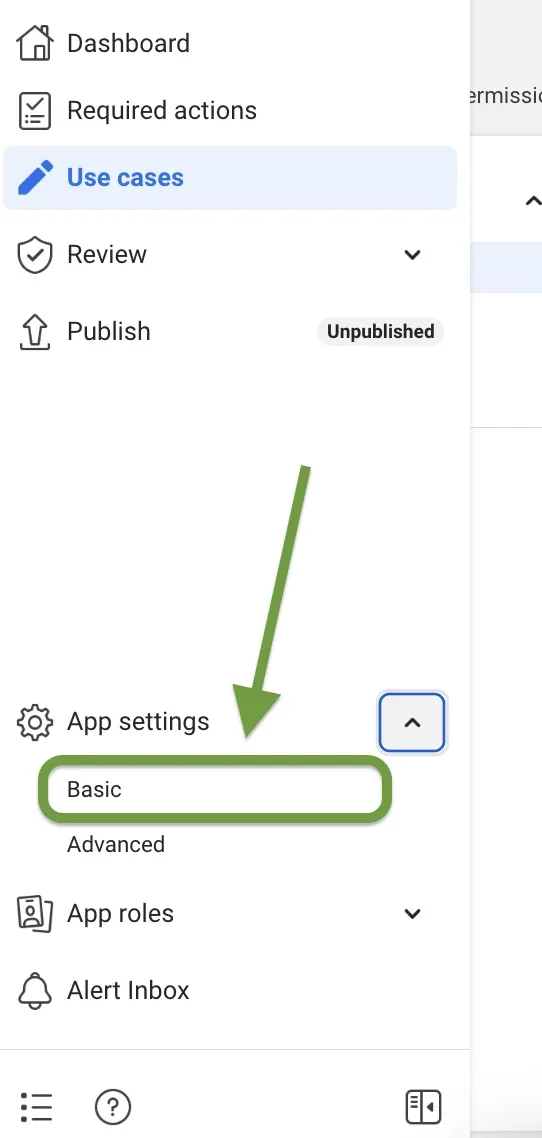
  1. 1 Open App settings → Basic The developer console’s left-hand menu — Dashboard, Required actions, Use cases, Review, Publish marked Unpublished — with App settings expanded and “Basic” outlined in green, a large arrow pointing at it.
  2. 2 Fill in the missing information

    For the app to work properly, complete the Privacy Policy URL, Terms of Service URL, User Data Deletion instructions, App Icon and Category.
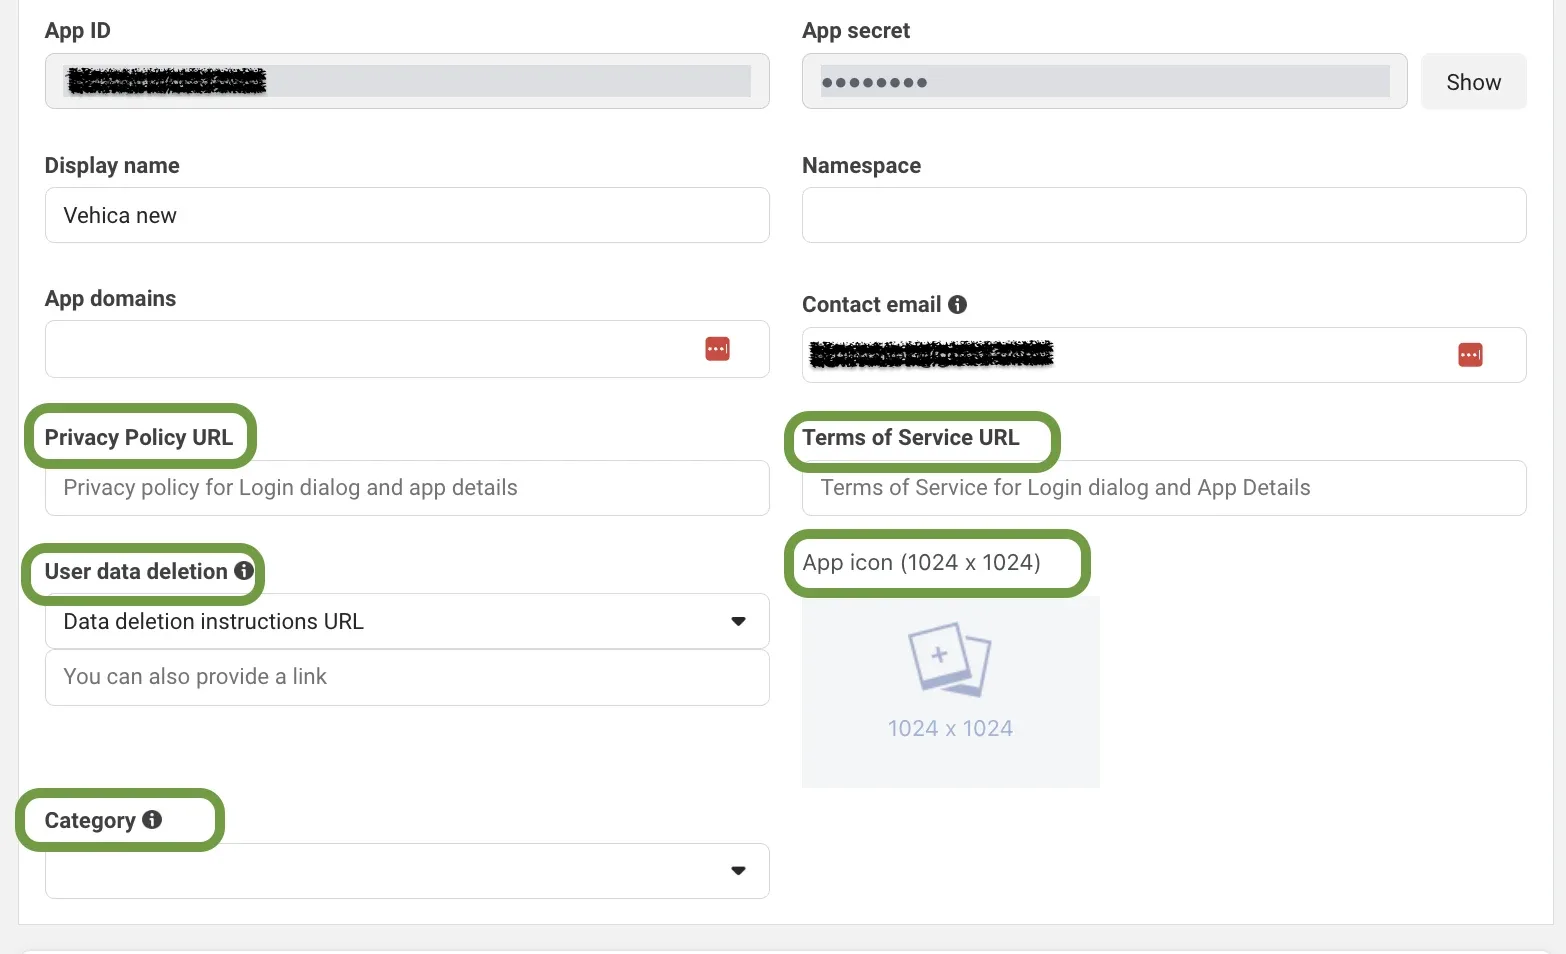
    The Basic app settings form with App ID and App secret at the top, Display name “Vehica new”, and green outlines around the empty Privacy Policy URL, Terms of Service URL, User data deletion, App icon and Category fields.
  3. 3 Copy the App ID and App Secret

    Click “Show” to reveal the secret, then copy both values.

    A close-up of the top of the Basic settings: the App ID field showing a numeric ID and the App secret field masked with dots, with a Show button beside it.
  4. 4 Paste them into the Listivo Panel

    Paste both values into Listivo Panel > User Panel > Social Authentication, in the Facebook Authentication section, and save the changes.
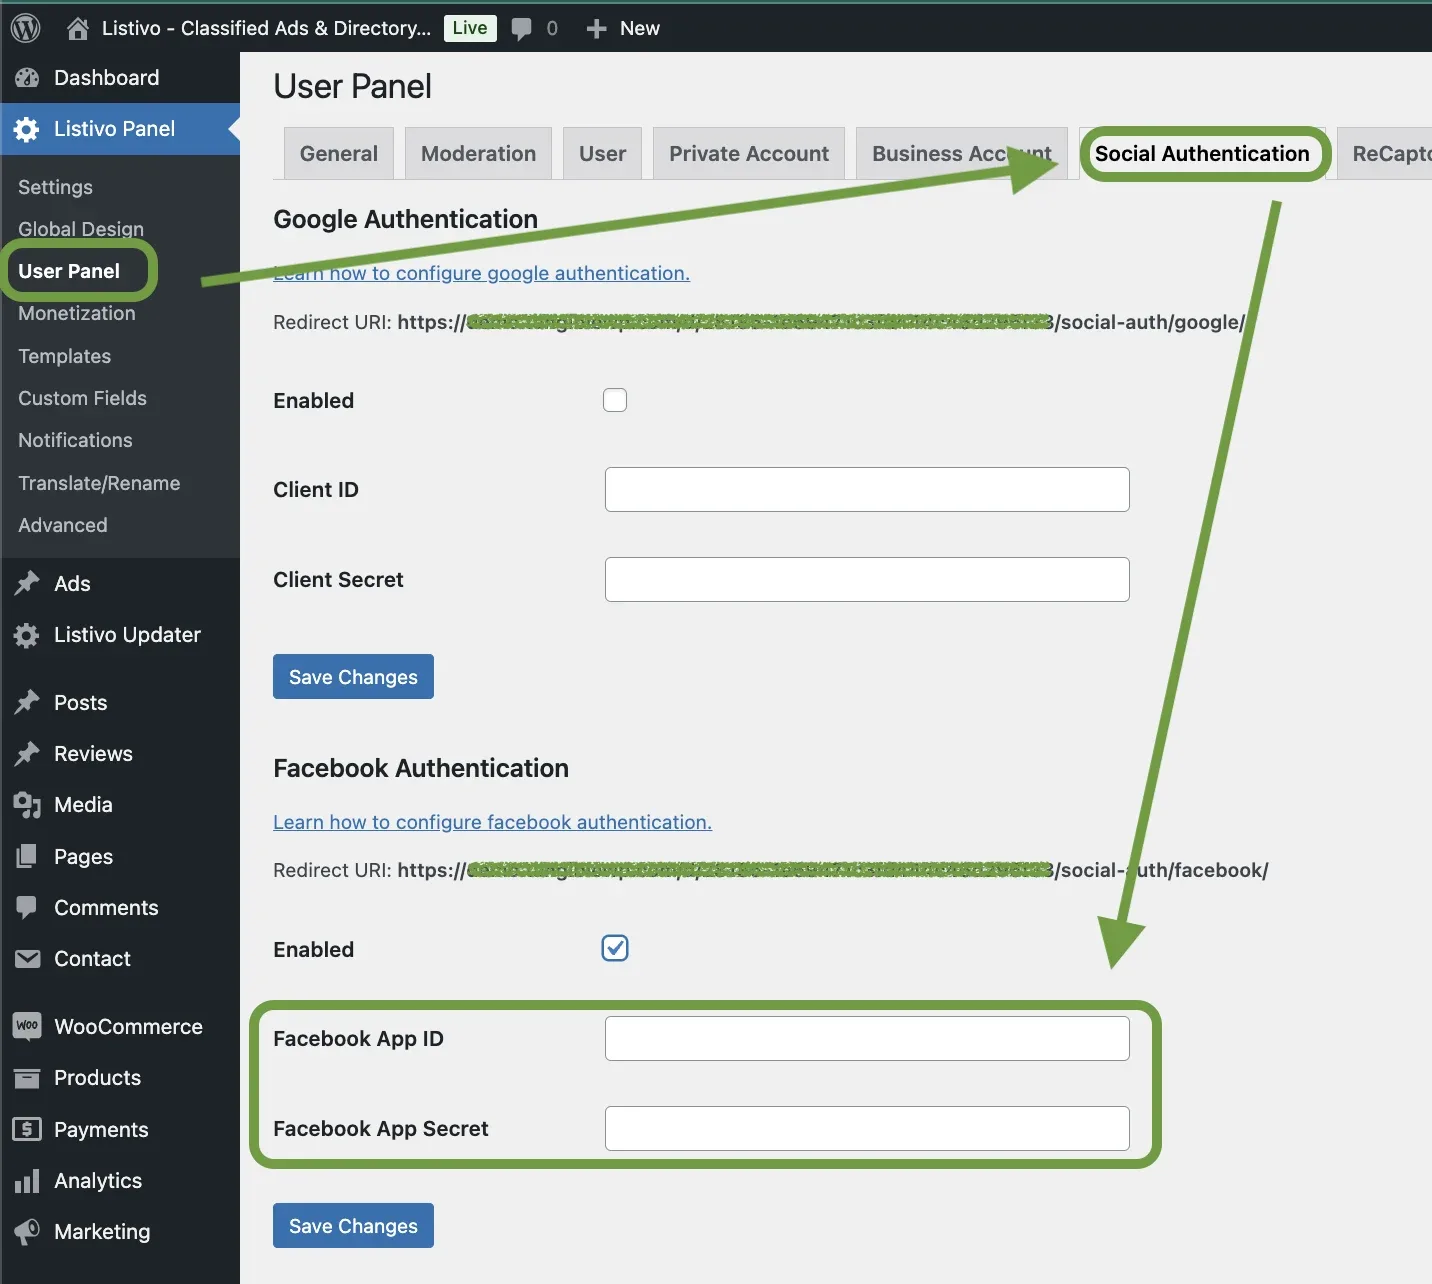
    The Listivo Panel User Panel in WordPress on the Social Authentication tab. Green arrows point at the tab and at the Facebook Authentication section, where the empty Facebook App ID and Facebook App Secret fields are outlined.

Submit the app for review and publish it

  1. 1 Answer the data handling questions

    For the app to work correctly, you must complete all required verifications listed under “Review” / “App Review”. You may be required to complete Business Verification – if so, it will be indicated in this section (in our case, verification is already marked as completed). Start by answering the questions related to data handling.
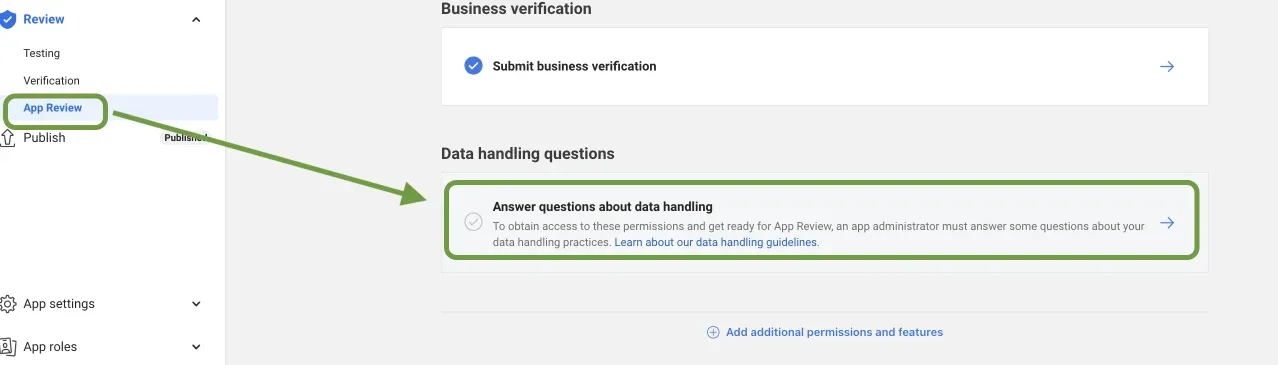
    The App Review section: Business verification with “Submit business verification”, and Data handling questions with “Answer questions about data handling” outlined in green. Arrows point at App Review in the menu and at that row.
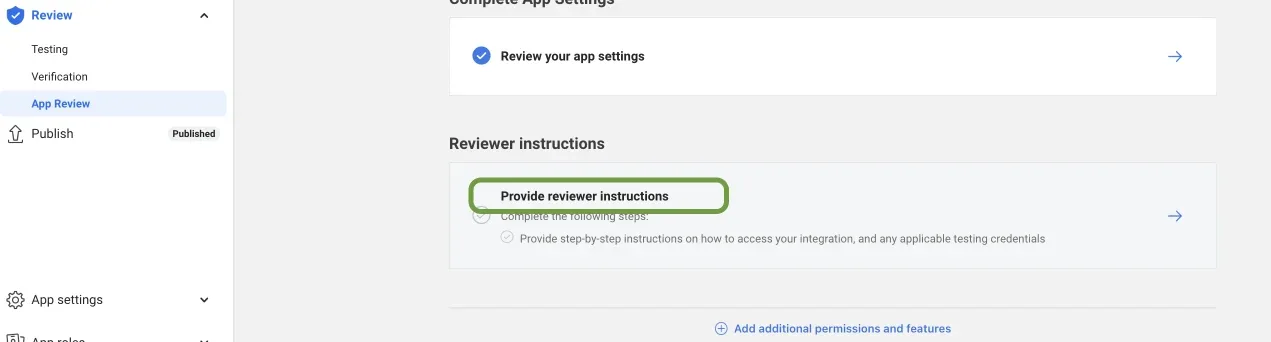
  2. 2 Provide reviewer instructions The App Review page with “Review your app settings” ticked and a Reviewer instructions section whose “Provide reviewer instructions” row is outlined in green. Publish in the left menu already reads Published.
  3. 3 Answer the permission questions

    Answer the questions related to the permissions marked in green: “How will this app use email?” and “How will this app use public_profile?”.
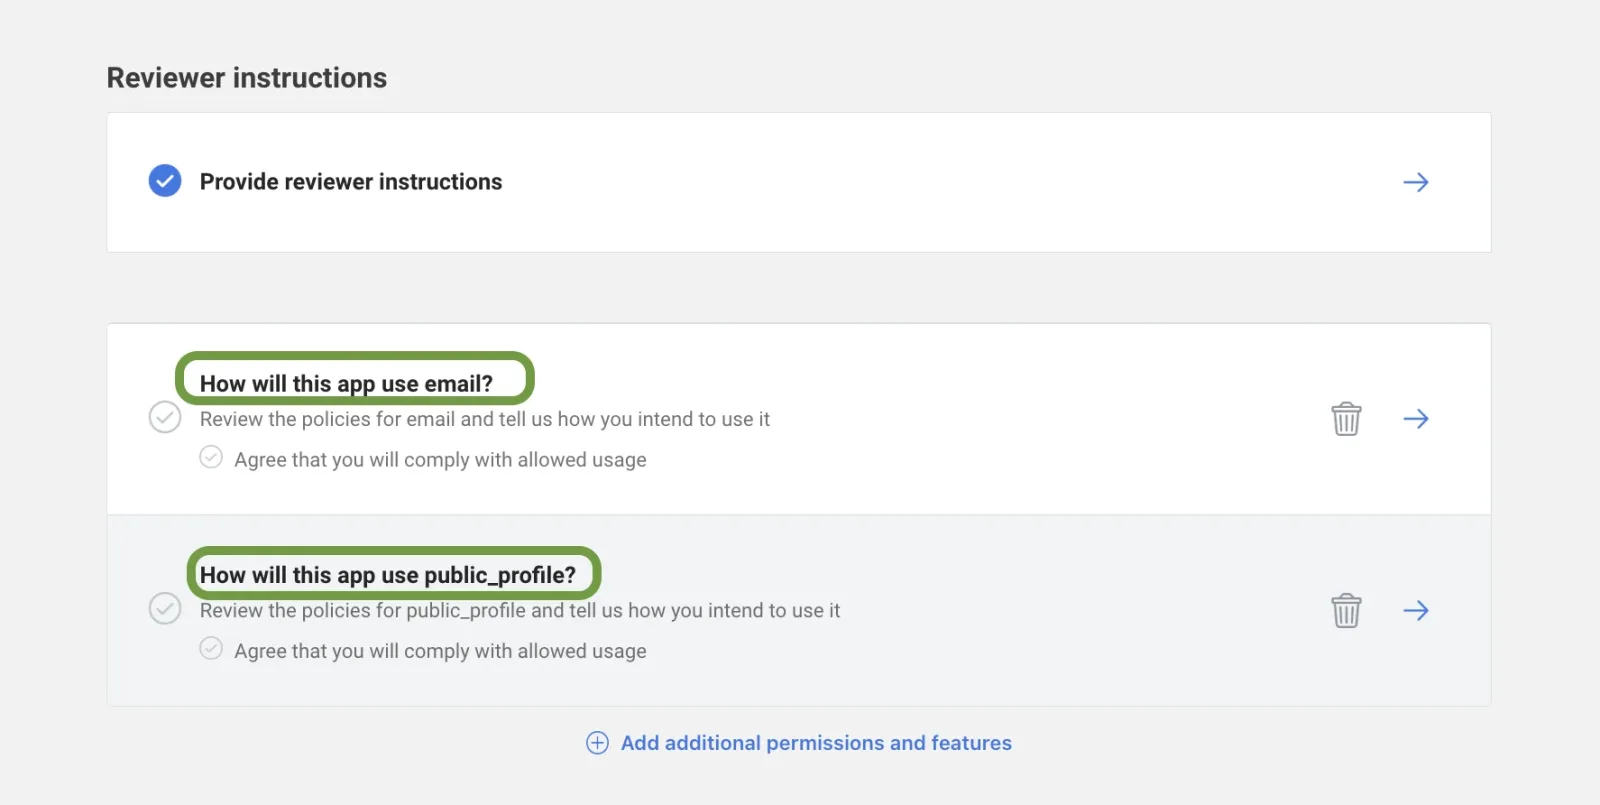
    The Reviewer instructions section with “Provide reviewer instructions” ticked, followed by two outlined questions: “How will this app use email?” and “How will this app use public_profile?”, each with an agreement checkbox.
  4. 4 Submit for review

    Once you have completed all the required steps, the “Submit for Review” button becomes active. Click it to send your app for review.
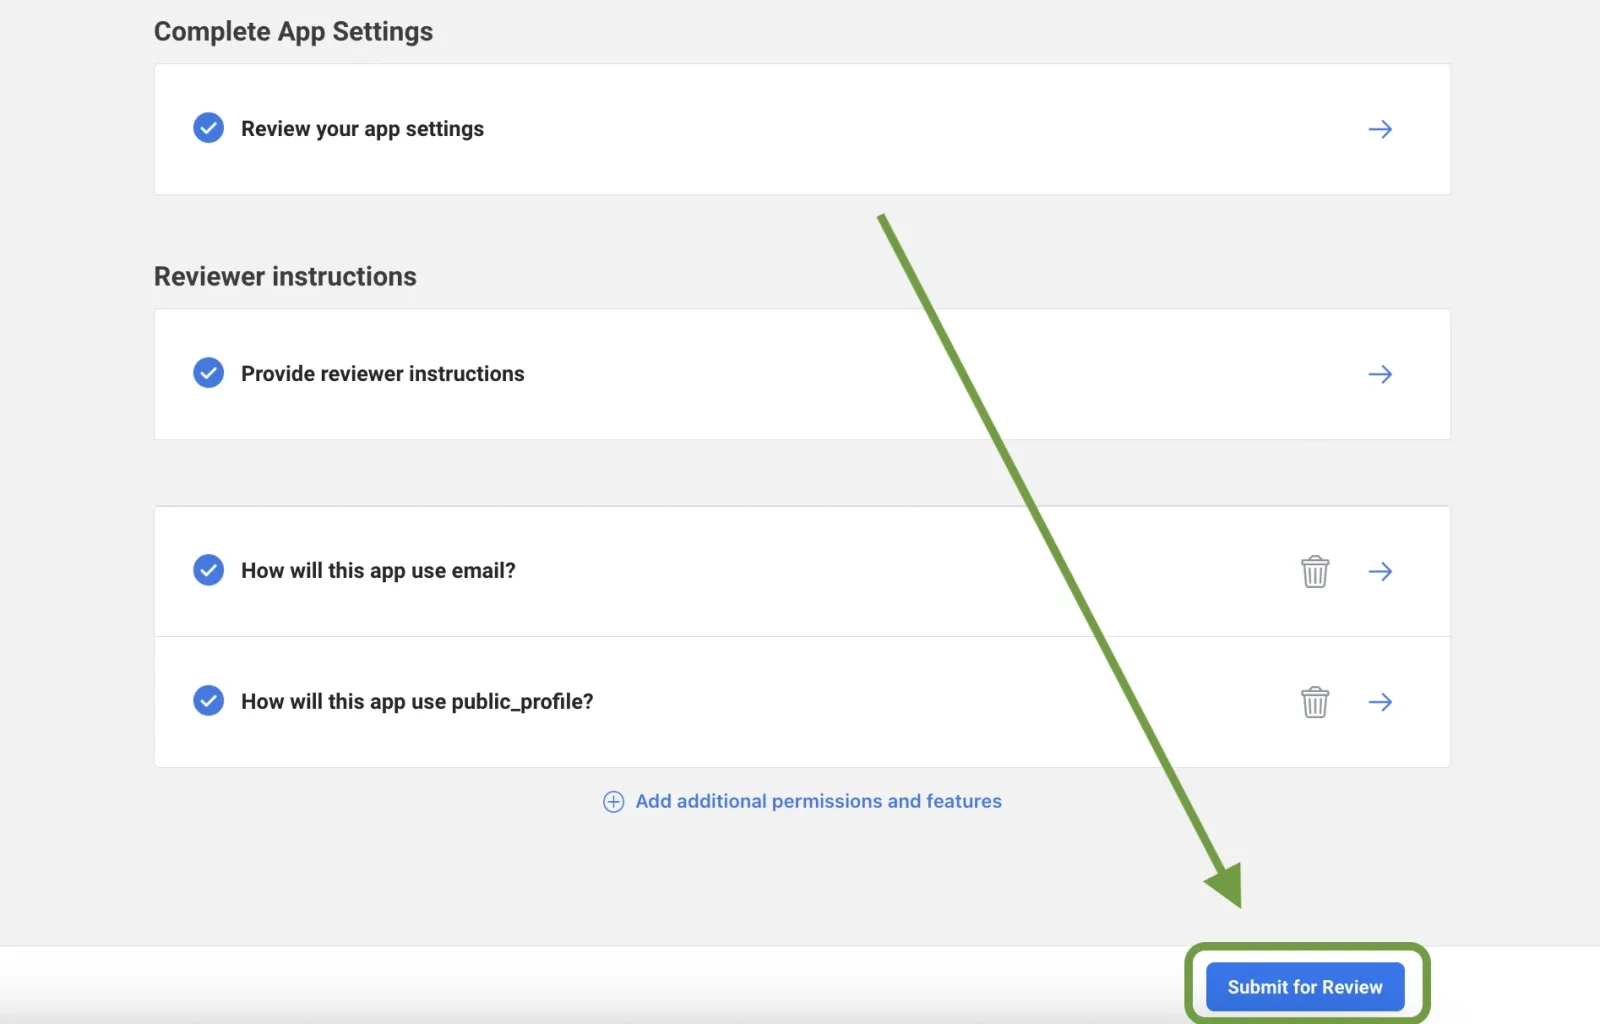
    The review checklist with Complete App Settings, Reviewer instructions and both permission questions all ticked blue, and a green arrow pointing at the “Submit for Review” button at the bottom right.
  5. 5 Publish the app

    Go to the “Publish” section and then click “Publish” in the bottom-right corner.
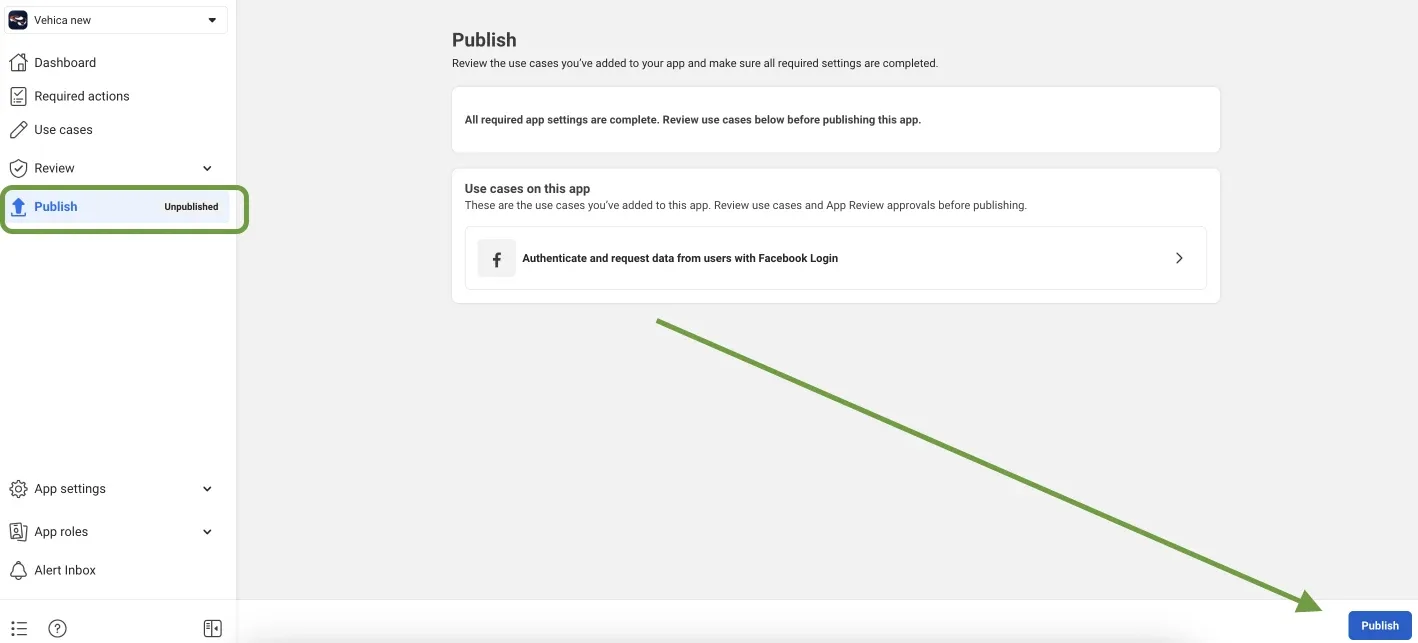
    The Publish page stating that all required app settings are complete and listing the Facebook Login use case, with Publish highlighted in the left menu and a green arrow pointing at the blue Publish button.
  6. 6 Confirm the app was published

    After publishing, you will receive a message confirming that the app was published.
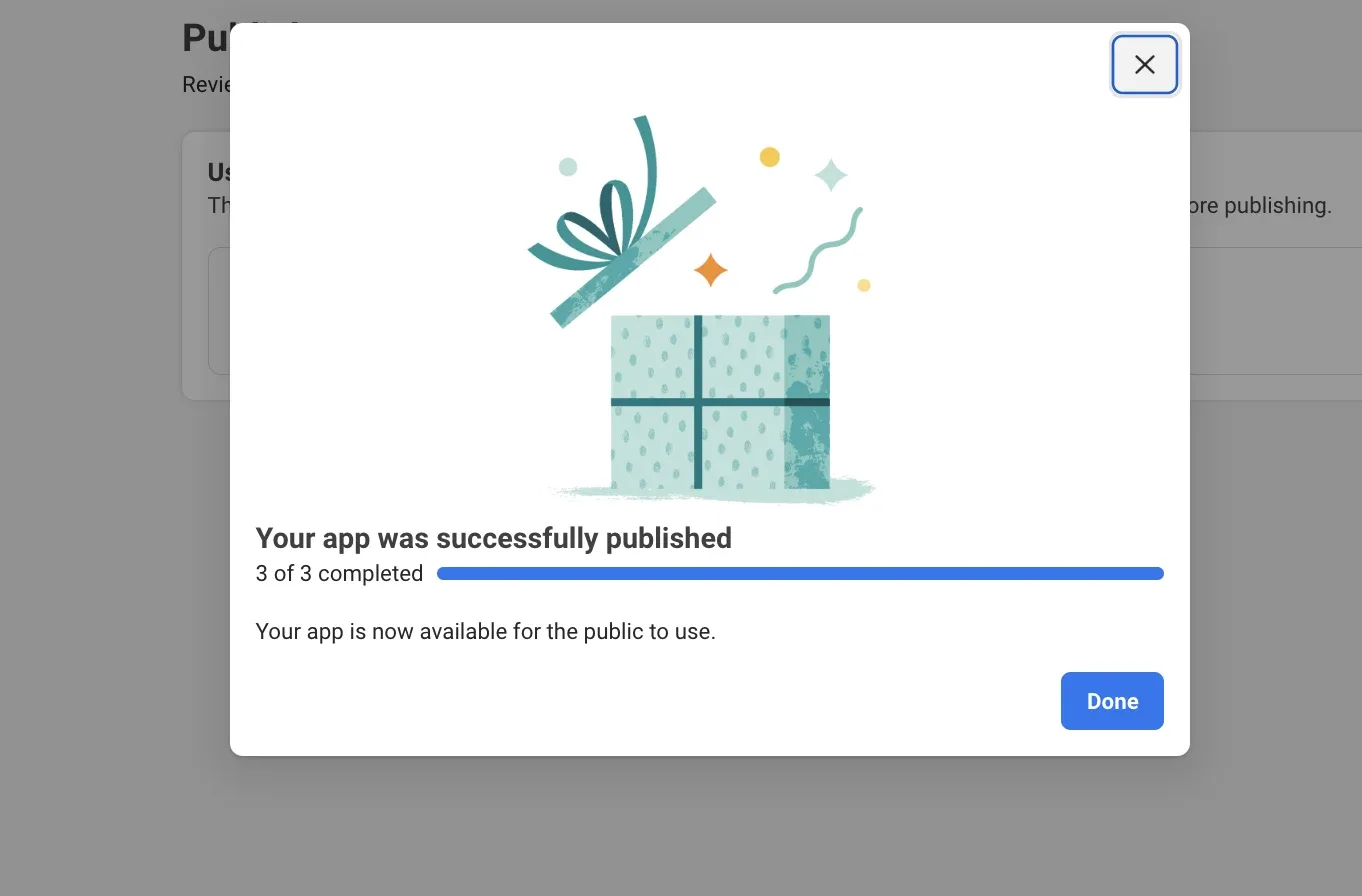
    A confirmation dialog illustrated with a gift box, reading “Your app was successfully published”, a full 3 of 3 completed progress bar, a note that the app is now available to the public, and a Done button.

Now the Facebook login should be available on your website.

Resolving permission issues in Live mode

If your app operates smoothly in development mode but encounters problems in Live mode, the issue may stem from permissions settings.

To address this, navigate to App Review > Permissions and Features > public_profile and check whether the API calls column is active. For your app to function properly, it should be set to “Auto granted”, as shown below:
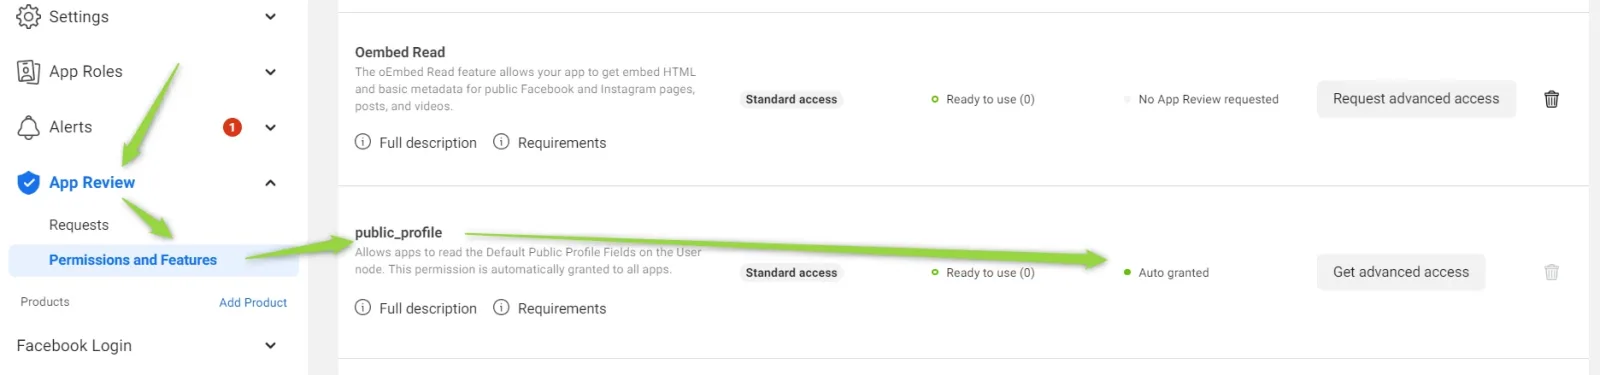
The App Review Permissions and Features table. The public_profile row shows Standard access, “Auto granted” in the API calls column and a “Get advanced access” button; the row above it still requires App Review.

However, if you find it displayed as “Inactive (0)” like this:

A close-up of the public_profile row showing “Advanced access” with a red status reading “Inactive (0)”, with green arrows pointing at the permission name and at the status.
This one is on Facebook's side
An “Inactive” status means Facebook requires additional verification for your app — the problem is not related to WordPress or the Listivo theme. To resolve it, follow Facebook’s App Review process described in their official documentation: https://developers.facebook.com/docs/app-review/introduction

Facebook requires that the public_profile permission is upgraded to “Advanced” for “Facebook Login” functionality. To enable this option, you must complete Business Verification. For more information on access levels, please consult the following resource: https://developers.facebook.com/docs/graph-api/overview/access-levels/

Ask the people who build Listivo

We answer by email from support@tangiblewp.com. With Premium Support, we also fix your site when something breaks.

Was this guide helpful?